Showing posts with label Diy. Show all posts

8/2/13

Sharing a little DIY for you today

Aren't these little booties adorable?  I have convinced myself that I must make them for my little nephew.  They look so simple to make, which is what I need, since I'm not much of a sewer and don't have much patience.  I think they will be the perfect afternoon project for me!  Will you join me?  You can check out the full tutorial here.


Pin It

7/26/13

diy stained glass vases | guest post by haley

For awhile now, I've been keeping the glass bottles from Izzes and Starbuck frapuchinnos, etc. The only thing is...now I have a collection of empty bottles that I don't have room to display all at once. The other day, though, I had an idea to make a sort of stained-glass looking vase out of some of them. (Ok, so it's not exactly stained glass, but you get the idea. ;)) When finished, it's really neat to put them on the window sill to see the light through the colors.

Here's how to make them...
You will need...
acrilyc paints, liquid glue, a paint brush, and a clear glass bottle (with all lables removed)
Step 1: With your glue, draw a pattern over the bottle.

Step 2: Let the glue dry. (When dry, it will leave a "foggy" look between the colors.)
Step 3: When the glue has dryed completely, using your paint and paintbrushes, paint in between the lines you made with the glue.

Step 4: Let the paint dry, then put some pretty flowers in your colorful vases!
Thanks, Joanna, for having me guest post today!

Much love,
Haley

Find me here...blog // goodreads // pintrest Pin It

7/24/13

Milkmaid Braids

My sister, Mary, a while back posted on my Facebook telling me that I just had to try this hairstyle... Milkmaid braids.  She sent me a link to the tutorial and it was so amazing and made the hairstyle look so simple that, I decided that I really did need to try it.  Well, I tried it, and loved it, and still love it.  This hairstyle is very simple and can easily be mastered with a little practice.  I highly recommend you try it out for yourself, and don't forget to tell me what you thought of it in the comments below!...  So, check out my milkmaid braids, then click HERE for the tutorial I used (the tutorial has tons of GIFs, which I kind of love).

photo credit- Charlotte
Pin It

7/11/13

The Sophisticated Twists Hair Tutorial


Way way back, I posted this and got a lot of compliments on my hair and people asking me to do a tutorial on it.  I thought it might be fun to do a tutorial on the hairstyle but time passed, and I forgot about the tutorial and the hairstyle, until I was looking on my "hair" board on Pinterest.  I had pinned the picture of my hair from the post a while ago and came across it last week.  I was thinking to myself, "Oh, yeah, I really liked that hairstyle, why haven't I done it lately?"  I tried it, added a braid, and I've been wearing my hair like this a lot lately.  It is so easy and fast, but looks nice and like you spend a lot of time on your hair (even though you really didn't).  This hair style is also really versatile,  it could look great messier to give it a little bit more of a casual look, or you can make the twists tighter to give it a more structured and dressier look.  When I asked one of my sisters what she thought of my hairstyle, she said it looked "romantic"...  That's not what I was really going for, but I'll take it...  (If you have any questions, please ask them in the comment section below!)

You will need:
bobby pins
plastic hair tie

Section off your bangs from the rest of you hair, twist, and loosely bobby pin them back.  Randomly take chunks of your hair and loosely twist and bobby pin them back and in place.  When you reach to your ears, stop twisting on one side, but continue to make a couple more twists on the other side to bring the rest of your hair to one side.  Loosely braid the rest of the hair and secure with a plastic hair tie.

You can see my last hair tutorial here.


Pin It

5/1/13

Hair Accesories

Hair accessories, perfect to dress up a messy bun, a boring pony tail, or just to bring something special and new to your outfit.  I'm especially a fan of the large burettes, I love how simple and classic they look.  Oh, and don't forget the amazing turbans out there!  I have personally never tried a turban, but I love the look that they give.  Hopefully someday soon I'll try this tutorial out for them.  I would love to build up a small collection of unique hair accessories, so I'm keeping my eyes open for any little treasures. *smile*

What are your thoughts on hair accessories?  Do you have any favorites?  

P.S.  I convinced my sister-in-law to make a blog *fulfillment*.  Check it out, Home on Spring Street.


1(on Etsy).2.3(tutorial).

Pin It

4/16/13

Twisted Up-Do Hair Tutorial


Hey everyone!  I know, I know, it has been a really long time since I last posted, but I have some more posts in the works so bare with me. :)

This hairstyle is one of my new favorites.  I'm that kind of girl who loves a complicated looking hairstyle that only take minutes to do, and this is defiantly one of those kind of hairstyles.  After a few practice runs, I could do it in just a few minutes.  Yes, thats what I like!  Another thing that I love about this hairstyle, is how it is so versatile.  It can be made to look a bit messier and laid back or it can be made to look polished and very dressy.  To sum it all up, this is the perfect hair style for anyone who wants a quick up-do, but is tired of the standard ponytail. 


What you will need:  Hands and a few bobby pins.

1. Separate your hair into two pieces where you want your bun to be.  
2. Take one section of your hair and starting at the top, take a smaller piece of hair and twist, then gather some more hair, and twist and gather, ect.  While you do this, try to twist your hair as tight as possible, and depending on how short your layers are, you might have to bobby pin some loose hair back as you work your way down.
3. Continue to twist you hair until you reach the end.
4. Twist the other piece of hair just as I described to you in step 2.  
5. Begin twisting the two pieces of twisted hair together and around each other (there is a lot of twisting going on, if you haven't already noticed...) to form a bun.
6. Secure with bobby pins.  I only need 3 or 4 for my bun.

Voila! There is your twisted up-do!  If you have any questions, please ask!


Pin It

12/19/12

Beeswax candles

Aren't these candles adorable?  I have fallen in love with them... yes, I have fallen in love with beeswax candles.  I love the organic and tectured look that they have.  I think they would look lovely in different height candle holders, clustered on a side table.  Don't you?  You can make them by using this tutorial!  This is totaly on the top of my list of 2013 crafts...

Thank you, Kelsie for guest posting!
Pin It

11/23/12

DIY Gift Guide for 2012 Christmas

How was your Thanksgiving?  Our Thanksgiving was amazing and filled with food... lots and lots of food!  We played "football" with my dad's side of the family, which was fun and also made me realize how out of shape I am... yeah, I need to work on that.  Then on Wednesday we fixed a big meal for my dad's work.  THEN... last night we ate with my mom's side of the family for supper.  All of the food everywhere was amazing.

Are any of you going black Friday shopping.  I'm not much of a black Friday shopper, or any kind of shopper.  I'm content sitting here, crocheting, while Mom and Rebekah (oldest sister) hit the mall.  For some reason shopping has never appealed to me for some reason.

...

I thought it would be fun to put together a list of DIYs that would be perfect for Christmas gifts, so here it goes.
...
Christmas is the time for giving gifts, right?  And you don't want to break your penny bank?   Homemade gifts, I think, are better than bought-at-a-store gifts.  They tell the person that you actually took time to make them something special. Besides, who wouldn't like an excuse to sit down and get crafty?   

I hope you enjoy scrolling through this post, and find some good DIYs to try!

P.S. Get creative this year with wrapping your gifts.  Here, Martha Stewart has some cute Packaging ideas.

P.P.S.  I have been tempted all week to post this before Thanksgiving, but have managed to keep it hidden in my drafts until the day after.   It was hard...


Pin It

9/14/12

Messy bun tutorial!


Hey-o!  Here is the tutorial, finally!

A messy bun is my goto hairstyle.  Whenever I'm having a bad hair day or if I'm running too late to do anything else, this is what I do.  This hairstyle takes me about 3 to 5 minutes and I just love the look of it.  When I first started doing messy buns... they were awful, but practice does make perfect.  So, don't feel that you can't do this, you can, it just takes some practice!

One thing while doing messy buns, is sometimes they look more like buns than messy buns.  To try to stay away from them just being a bun, don't make them too tight, and don't be too picky about loose ends and weird clumps.  Those loose ends and weird clumps are what make the messy buns!

Also, I find if you have straightened your hair before doing this, it doesn't work that great, it just looks spiky.  Trust me...

I hope you find this tutorial helpful, and if you have any questions, just ask. :)
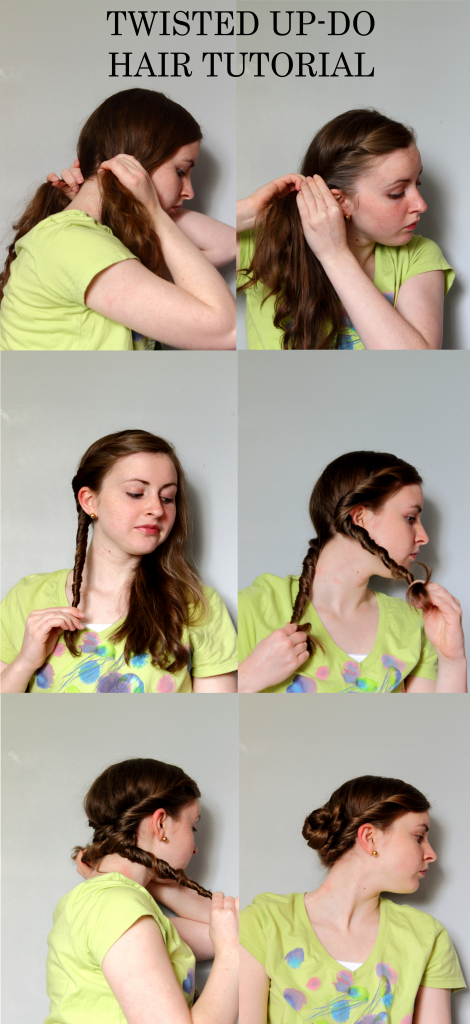
MESSY BUN TUTORIAL

You will need:
hair band (if you have thick hair like me, you should you use a thick one, so the messy bun isn't sagging down)
bobby pins  (You should not need to use any bobby pins for the bun, but if you need them for your bangs ect.)

Step One:  Pull your hair up with your hands to where you want your bun, I prefer mine at the crown of my head.  Now take your hair band and messily make a bun.
Step Two:  Gently tease your "bun" to get all the hair that is about to come out, out.  Don't over due it though to where you have no bun left.  It should look something like this...

Step Three:  Now, take pieces of that loose hair and twist them, then wrap them around the bun.  Then when you wrap it around, tuck the hair under the hair band, which should be hidden under the bun. It is okay if little ends are showing though, it makes the bun more "messy"!
There you have it! Your messy bun!


Pin It